
TL;DR
Discover how to create an engaging and effective Generative AI demo in Julia with six crucial tips, focusing on simplifying technical complexities, crafting a compelling narrative, and enhancing user experience with stunning UI and prompt caching. This guide ensures your demo captures the imagination of your stakeholders and showcases the potential of GenAI technology.
Crafting Your First Generative AI Demo: A Guide to Wow Your Stakeholders
In the rapidly evolving world of Generative AI (GenAI), demonstrating the capabilities of your solution in a way that captivates and convinces stakeholders is more crucial than ever. A well-crafted demo can serve as a powerful tool to showcase technical possibilities and ignite the imagination of your audience. However, the goal here is not to present a polished, ready-to-use product but to illuminate the potential applications of GenAI in a vivid, engaging manner.
Understanding the Purpose of Your Demo
Before diving into the mechanics of building your demo, it's essential to distinguish between a demo and a Minimum Viable Product (MVP). A demo is a showcase, designed to highlight what's possible with GenAI, helping stakeholders envision how they might use such technology in their own contexts. It’s about painting a picture of the future, not delivering the final product for immediate use.
Six Essential Tips for a Successful GenAI Demo
Crafting a demo that stands out requires more than just technical know-how. It demands strategic planning, creativity, and a focus on the end-user experience. Let’s explore six tips that can make your GenAI demo a resounding success.
Tip 1: Balance Your Focus Away from the Technical
When preparing your demo, follow the 33/33/33 rule:
- 33% Good Planning: Dedicate a third of your efforts to planning. Identify the core feature or capability — your "wow" factor — and develop a "screenplay" that showcases it compellingly.
- 33% Simplifying Technical Aspects: Don’t get bogged down in technical perfection. Your demo should be simple yet effective, highlighting GenAI’s capabilities without unnecessary complexity.
- 33% Polishing the UI: Aesthetics matter. Spend a third of your time ensuring the user interface (UI) is clean, engaging, and intuitive.
Let's dive into the specifics of each step.
Tip 2: Find Your “Wow” and Write a “Screenplay” for it
Determine what aspect of your GenAI solution will most impress your audience. Is it the interface, the novel insights it generates, or its ability to synthesize and summarize complex information?
Once identified, craft a detailed screenplay for your demo. This script should outline every step of the demo, simulating a real user interaction (it will help you with the technical simplifications!) Focus on showcasing this core feature and simplify everything else.
Tip 3: Break Bigger Tasks into Individual “Skills”
Instead of striving to create a GenAI solution that can do everything, break down the larger workflow/conversation into smaller, discrete tasks or “skills.”
For example, is there a web search feature? A set of specific questions it can answer? An email draft? Each one of these is a "skill" that can be built independently for faster iteration and more reliability (think "input -> output").
Your demo can then call on these skills separately (without any preceding conversation history) to keep things simple. It will just look like a big conversation, but it's, actually, a series of smaller, more reliable interactions.
This approach allows you to highlight specific strengths of your solution without overcomplicating the demo. Think of each skill as a standalone feature that, when combined, showcases the versatility and power of your GenAI solution.
Tip 4: Remove Any Unnecessary Complexity
Your demo should be as straightforward as possible. Avoid complex setups like chained Large Language Model calls, which can introduce unnecessary points of failure and don't waste time on building things you don't need!
For example:
- Do you need some data from the database? Pick the 20 most interesting records that will deliver the "wow".
- Do you need some web scraping? Copy & paste the few pages you need manually.
- Do you need some LLM router (to pick the right "skill")? You could use
aiclassifyto do that, but it's good enough to use simply IF conditions withoccursin(). Thanks to your screenplay, you know exactly what to expect and when, so you can keep it simple.
To be clear, you don't need to follow the "screenplay" word by word, but it's a good guide to keep things simple and focused. This focus on the user experience over technical complexity will make your demo more accessible and impactful.
Tip 5: Enhance Your Demo with a Stunning UI
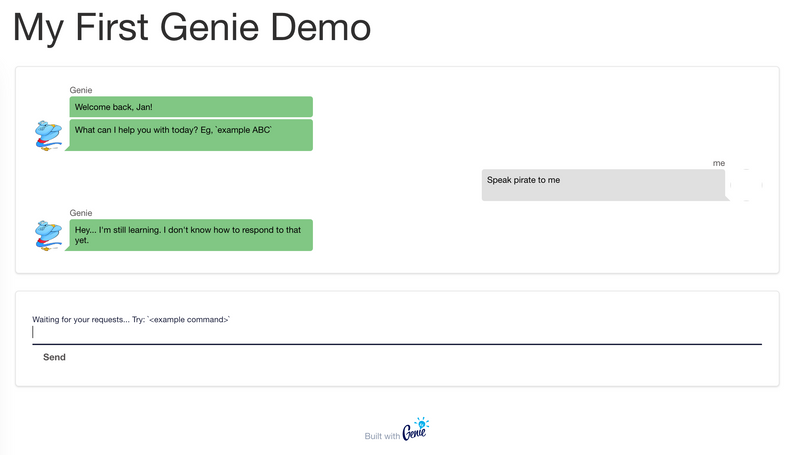
Leverage tools like GenieFramework's Stipple.jl to quickly develop a beautiful UI for your demo.
With just a few lines of code, you can create an application that not only functions well but also looks professional and engaging.
You can find a basic example of a Stipple app below - it's less than 100 lines of code (50 active lines)! Code is provided in the Appendix and you can run it from your Julia REPL.
In other news, the team behind GenieFramework has just launched their new no-code builder. Make sure to check it out: Web Applications in Julia with Genie Builder.
Tip 6: Utilize Prompt Caching for a Smoother Experience
Implement prompt caching to eliminate latency and ensure a fluid demo experience. This strategy involves storing and quickly retrieving responses for common queries or inputs, thus avoiding the need for real-time generation during the demo. It's not about deceiving your audience but about showcasing your GenAI solution's potential without technical hitches or delays (you would optimize the latency in production use cases anyway).
There are Memoization.jl and Memoize.jl, but neither of them supports caching to disk, so you cannot restart your REPL.
I prefer to use simple Dict and if-else statement:
# Remember the conversation via key: `hash(conversation)`
CACHE = Dict{UInt64,MyMessage}()
aigenerate(x) = last(x)  # mock-up only, you would need to convert MyMessage to PromptingTools types for it to work

# Conversation 1
conv1 = [MyMessage(["I am a user"], true), MyMessage(["I am Genie"], false)]
output1 = MyMessage(["Nice to meet you, Genie!"], false)
CACHE[hash(conv1)] = output1

# Example use
conversation = conv1 # known conversation
## conversation = [MyMessage("New conversation", true)] # unknown conversation
if haskey(CACHE, hash(conversation))
    @info "> Cache hit!"
    output_msg = CACHE[hash(conversation)]
else
    @info "> Cache miss! Generating response..."
    msg = aigenerate(conversation)
    # Save the response for later
    CACHE[hash(conversation)] = msg
end
The beauty is that
1) You can decide whether to cache the whole conversation or only the last user message (keep it simple as per Tip 3!)
2) You can then serialize the Dict to disk and load it back when you restart your REPL.
Bonus Tip: Implement Quick Actions
To make your demo even more engaging, incorporate dynamic "quick action" buttons that guide users through predefined next steps or use cases.
This feature not only makes the demo more feature-rich but also ensures a smoother experience by reducing the uncertainty of open-ended interactions. Quick action buttons can be easily implemented in Stipple, enhancing the flow of your presentation and making it easier for your audience to understand the full capabilities of your GenAI solution.
Additionally, by defining these actions in advance, you can more effectively leverage prompt caching, ensuring that each demonstration runs smoothly and without delay.
Appendix: GenieFramework UI Example
If you want to see how easy it is to create a stunning UI for your GenAI demo, here's a basic example using GenieFramework's Stipple.jl.
First, install GenieFramework (PromptingTools is not required, just comment it out!)
Second, run the below code in your Julia REPL (or save it to a script and run it from there).
Once the server starts, it will tell you to navigate to http://127.0.0.1:8000 in your browser to see the UI (or just click on the link in the REPL).
If you have any questions, there is a dedicated Genie channel on the JuliaLang Slack and the Genie team also runs a great Discord server where you can get help!
Example:
module App
using PromptingTools
using GenieFramework # GenieFramework v2.1.0
@genietools

# ! Params
GENIE_IMG = "https://easydrawingguides.com/wp-content/uploads/2021/10/how-to-draw-genie-from-aladdin-featured-image-1200.png"
INTRO_MESSAGE = [
    "Welcome back, Jan!",
    "What can I help you with today? Eg, `example ABC`",
]

### Helpful functions
"MyMessage is a struct that represents a message in the chat"
@kwdef struct MyMessage
    id::Int = rand(Int)
    name::String = "Genie"
    avatar::Union{String,Nothing} = nothing
    text::AbstractVector{<:AbstractString} = String[]
    from_user::Bool = false
end
"Create a `MyMessage` from a user or from Genie"
function MyMessage(text::AbstractVector{<:AbstractString}, from_user::Bool=false)
    MyMessage(; from_user, text, avatar=from_user ? nothing : GENIE_IMG, name=from_user ? "me" : "Genie")
end
MyMessage(text::AbstractString, from_user::Bool=false) = MyMessage([text], from_user)

### Dashboard logic
@appname MyDemoApp

@app begin
    @in btn_send = false
    @in user_input = ""
    @in conversation = MyMessage[]
    @onchange isready begin
        @info "> Dashboard is ready"
        conversation = [MyMessage(INTRO_MESSAGE, false)]
    end
    @onbutton btn_send begin
        @info "> User said: $user_input" # for tracking in REPL
        # Easy way to reset conversation -> just send "reset"
        if strip(lowercase(user_input)) == "reset"
            user_input, conversation = "", [MyMessage(INTRO_MESSAGE, false)]
        elseif !isempty(user_input)
            ## New converation message
            conversation = push!(conversation, MyMessage(user_input, true))
            # Genie's response logic goes BELOW, eg, `aigenerate(user_input)`
            genie_says = "Hey... I'm still learning. I don't know how to respond to that yet."
            user_input = "" # empty the user input
            conversation = push!(conversation, MyMessage(genie_says, false))
        end
    end

end

### Dashboard UI
function ui()
    [
        heading("My First Genie Demo"),
        ## Row 1: Chat
        row(class="",
            [
                cell(class="st-module",
                    [
                        ## awesome trick that allows to pass a vector of messages (=`conversation`) and generates an object for each
                        chatmessage(R"message.text", name=R"message.name", sent=R"message.from_user", avatar=R"message.avatar", size=4, @for("message in conversation"), key=R"message.id"),
                    ]),
            ]),

        ## Row 2: Input From User
        row([
            cell(class="st-module",
                [
                    Html.div(class="input-group",
                        [
                            textfield("Waiting for your requests... Try: `<example command>`",
                                :user_input,
                                @on("keyup.enter", "btn_send = !btn_send")),
                            btn("Send", @click(:btn_send)),
                        ])]),
        ]),
    ]
end

@page("/", ui)
# Start the server
Genie.isrunning(:webserver) || up()
end # end of module
Credit for the title image goes to DALL-E 3.

Top comments (0)