
TL;DR
In this tutorial, you'll learn how to build a sophisticated RAG chatbot in Julia, focusing on efficiently retrieving and processing information from the DataFrames.jl documentation to generate accurate and contextually relevant responses. It's a hands-on guide to understanding and implementing the key components of retrieval-augmented generation, from API interactions to response generation.
Introduction
Dive into the worlds of Generative AI and Julia programming as we build a Retrieval Augmented Generation (RAG) chatbot, tailored to navigate and interact with the DataFrames.jl documentation. "RAG" is probably the most common and valuable pattern in Generative AI at the moment. This hands-on guide will lead you through crafting a chatbot that's not just smart, but also specialized in the intricacies of this popular data manipulation package in Julia.
-
Targeted Learning: We're focusing specifically on
DataFrames.jl, turning the great but extensive documentation into an interactive, AI-powered guide. - Practical Application: This isn't just theory; it's about applying RAG concepts to create a real-world, domain-specific chatbot.
- Hands-on Experience: We'll be building the chatbot from scratch, so you'll get a deep understanding of the inner workings of RAG. No frameworks, no shortcuts — just pure Julia code and a few core packages.
If you're not familiar with "RAG", start with this article.
What to Expect in Part 1
In this part, we'll cover the following key areas:
- Prerequisites
- Introduction to RAG
- Making API Calls
- Initial Setup
- Defining Custom Types and Functions
- Data Preparation and Chunking
- Embedding and Indexing for Retrieval
- Building the Interactive RAG Example
- End-to-End RAG Implementation
- Conclusion
Each section will focus on different aspects of the chatbot app. Whether you're new to Julia or an experienced programmer, this tutorial aims to enhance your skills and understanding in building the "Hello World" example of a RAG system.
Looking Ahead to Part 2
Stay tuned for the upcoming Part 2 of this series, where we will introduce a streamlined approach to building RAG chatbots using PromptingTools.jl.
Let's get started!
I'd suggest just following along, but you can find all the code and text files used in this GIST.
Prerequisites
This tutorial assumes you have the following:
- OpenAI API Key - You can obtain it from OpenAI's Quickstart Guide.
- Basic knowledge of "prompting" - interacting with Large language models. I recommend reading OpenAI Prompt Engineering Guide.
- Basic knowledge of RAG - I strongly recommend reading this article.
- Basic knowledge of tokens and token usage - That is what you pay for. It's the "language" of LLMs. Check out this interactive demo: Tiktokenizer online and you'll get it.
- Downloaded text from at least 5 pages of DataFrames.jl documentation. We'll use it as a source of answers for the RAG chatbot. You can simply copy-paste the text from each page into a separate text file. Ideally, delete all the noise (like headers, footers, etc.) and keep only the text you want to use for the chatbot. Remember, garbage in, garbage out!
Now we can get started! Let's initiate our script:
using HTTP, JSON3 # for making API calls
# using OpenAI # for interacting with the API if you want to skip the first part of tutorial
using LinearAlgebra # for calculating "closeness" of document chunks

const MODEL_CHAT = "gpt-3.5-turbo" # default model for chat, fast and "cheap"
const MODEL_EMBEDDING = "text-embedding-ada-002" # default model for embedding test
const API_KEY = ENV["OPENAI_API_KEY"];  # Your API key should be kept secure - use ENV variables
Recap of Retrieval Augmented Generation (RAG)
RAG systems enhance language models by integrating a retrieval component. They first retrieve relevant information from a database (or other knowledge store) and then use this information to generate more informed and precise responses.
Imagine it as a two-step process:
- "Retrieval" - finding the right information, and then,
- "Generation" - crafting a response based on that information.
The concept is visually depicted in the following diagram:
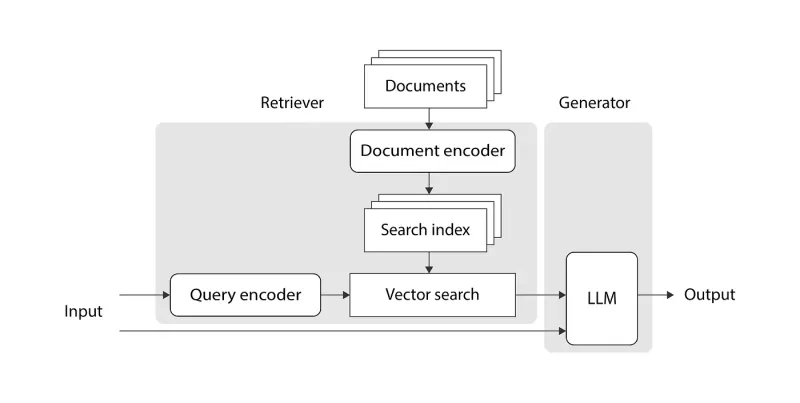
It comes from this article, which I strongly recommend if you're not familiar with RAG.
Making API Calls
Those not interested in API call details can skip ahead and use the create_chat function provided by the OpenAI.jl package.
In this section, we'll learn how to make direct REST API calls, a fundamental skill for interacting with most large language models (LLMs) like OpenAI's GPT-3.5 or GPT-4, because very often your application will throw an error that's related to the API call.
Script for API Calls
First, start with checking the OpenAI API reference.
This is the example call that we will replicate:
curl https://api.openai.com/v1/chat/completions \
  -H "Content-Type: application/json" \
  -H "Authorization: Bearer $OPENAI_API_KEY" \
  -d '{
    "model": "gpt-3.5-turbo",
    "messages": [
      {
        "role": "system",
        "content": "You are a helpful assistant."
      },
      {
        "role": "user",
        "content": "Hello!"
      }
    ]
  }'
Let's try to replicate this call in Julia:
- it will be a POST request (we're posting some data -- parameter
din the above) - JSON data we provide need to contain messages = array of dicts (see example)
- we need to add headers that include our API key
This script demonstrates how to interact with the OpenAI API using Julia.
# we did this above:
# using HTTP, JSON3 # for making API calls
# MODEL_CHAT = "gpt-3.5-turbo"
# OPENAI_API_KEY = ENV["OPENAI_API_KEY"];  # Your API key should be kept secure - use ENV variables

# Sample messages for the chat -- this is how OpenAI formats them
messages = [
    Dict("role" => "system", "content" => "You are a helpful assistant."),
    Dict("role" => "user", "content" => "Say Yo!")
]

# API URL
url = "https://api.openai.com/v1/chat/completions"

# Headers including API key
headers = Dict("Authorization" => "Bearer $API_KEY", "Content-Type" => "application/json")

# JSON-encoded body of the request
body = (; messages, model = MODEL_CHAT, max_tokens = 7) |> JSON3.write

# Making the POST request
resp = HTTP.request("POST", url; body, headers)

# This is what we get back -- Contents of `resp.body`
# {
#     "id":"chatcmpl-8KXEOkqznkayf3evH3W9yAf5K7Oj8",
#     "object":"chat.completion",
#     "created":1699904992,
#     "model":"gpt-3.5-turbo-0613",
#     "choices":[
#         {
#         "index":0,
#         "message":{
#             "role":"assistant",
#             "content":"Yo! How can I assist you",
#         },
#         "finish_reason":"length",
#     }
#     ],
#     "usage":{
#         "prompt_tokens":20,
#         "completion_tokens":7,
#         "total_tokens":27,
#     },
# }

# Parsing the response
response = JSON3.read(resp.body)[:choices][begin][:message][:content]
usage = JSON3.read(resp.body)[:usage]
cost = usage[:prompt_tokens] * 1e-6 + usage[:completion_tokens] * 2e-6

@info "Cost of this call: \$$cost"
Explanation:
-
Importing Libraries: We use
HTTPfor web requests andJSON3for JSON handling. - API Configuration: Set up the model and API key.
- Defining Messages: These are the inputs for the chatbot.
- Setting URL and Headers: The URL for the API and headers including the API key.
- Request Body: The JSON-encoded data sent in the request.
- Making the Request: A POST request to the API.
-
Response Handling: Extracting the chatbot's response and calculating the cost of the call. Notice how we call
JSON3.read(resp.body)to access the information from the API.
create_chat Function
This function wraps the API call process, simplifying future interactions:
function create_chat(api_key::String,
        model::String,
        messages::Vector{Dict{String, String}};
        http_kwargs::NamedTuple = NamedTuple(), api_kwargs::NamedTuple = NamedTuple())
    url = "https://api.openai.com/v1/chat/completions"
    headers = Dict("Authorization" => "Bearer $api_key",
        "Content-Type" => "application/json")
    # JSON-encoded data (string)
    body = (; messages, model, api_kwargs...) |> JSON3.write
    resp = HTTP.request("POST", url; body, headers, http_kwargs...)
    return (;
        response = JSON3.read(resp.body),
        status = resp.status)
end
Explanation:
- Purpose: To encapsulate the API calling process, making it reusable and more manageable.
Similarly, we'll need a create_embedding function for embeddings:
function create_embeddings(api_key::String, docs::Union{AbstractString, Vector{<:AbstractString}}, model::String;
    http_kwargs::NamedTuple = NamedTuple(), api_kwargs::NamedTuple = NamedTuple())

    url = "https://api.openai.com/v1/embeddings"
    headers = Dict("Authorization" => "Bearer $api_key",
    "Content-Type" => "application/json")

    # JSON-encoded data (string)
    body = (; model, input=docs, api_kwargs...) |>JSON3.write
    resp = HTTP.request("POST", url; body, headers, http_kwargs...)

    return (;response = JSON3.read(resp.body), status = resp.status)
end
In the next sections, we'll delve into the specifics of building and running a RAG chatbot.
Building the RAG Chatbot
Now, let's move on to the main part of our tutorial - building the RAG Chatbot in Julia.
Initial Setup
We start by importing necessary Julia packages and setting up configurations for our model and OpenAI API key.
# we already did this at the top
# using OpenAI # if you skipped the previous section; we need `OpenAI.create_chat` function
# using LinearAlgebra # for calculating "closeness" of document chunks

# const MODEL_CHAT = "gpt-3.5-turbo" # what OpenAI model to use for chat
# const MODEL_EMBEDDING = "text-embedding-ada-002" # what OpenAI model to use to translate text to numbers
Explanation:
-
Importing Packages:
OpenAIfor API interaction (if you haven't definedcreate_chatyet),JSON3for JSON processing, and others for various functionalities. - Setting Constants: Defining the model and embedding constants for ease of use throughout the script.
Custom Types and Functions
Struct Definitions
We define structures (structs) for managing prompts, AI responses, and document chunks efficiently.
# Define shared abstract type for custom printing
abstract type AbstractBuildingBlock end

# Convenience for building "messages" for the chatbot faster (see the standard format in the API calls section...)
@kwdef struct PromptTemplate <: AbstractBuildingBlock
    system_prompt::Union{String, Nothing} = nothing
    user_prompt::String = ""
end

# Return type for the AI model
@kwdef struct AIMessage <: AbstractBuildingBlock
    content::AbstractString
    status::Union{Int, Nothing} = nothing
    tokens::Tuple{Int, Int} = (-1, -1)
    elapsed::Float64 = -1.0
end

# Stores document chunks and their embeddings
@kwdef struct ChunkIndex{T <: AbstractString} <: AbstractBuildingBlock
    id::Symbol = gensym("ChunkIndex")
    embeddings::Matrix{Float32}
    chunks::Vector{T}
    sources::Vector{<:AbstractString}
end

# Structured show method for easier reading (each kwarg on a new line)
function Base.show(io::IO, t::AbstractBuildingBlock)
    dump(IOContext(io, :limit => true), t, maxdepth = 1)
end

# Utitity to be able to combine indices from different sources/documents easily
function Base.vcat(i1::ChunkIndex{T}, i2::ChunkIndex{T}) where {T <: AbstractString}
    ChunkIndex(;
        embeddings = hcat(i1.embeddings, i2.embeddings),
        chunks = vcat(i1.chunks, i2.chunks),
        sources = vcat(i1.sources, i2.sources))
end
Explanation:
- PromptTemplate: To hold the system and user prompts for the AI.
- AIMessage: To store the AI's response, status, token usage, and response time.
- ChunkIndex: To manage document chunks and their embeddings, crucial for the retrieval process.
The ChunkIndex struct is vital for organizing and storing the numerical embeddings of text chunks, creating an indexed database that the chatbot can efficiently search through to find the most relevant information. This indexed approach significantly speeds up the retrieval process, crucial for the chatbot's quick and accurate response generation, because we don't have to "embed" all documents every time we want to find the most relevant information.
Utility Functions
These functions facilitate rendering prompts, generating AI responses, and embedding document chunks.
"Builds a history of the conversation (=messages) to provide the prompt to the API. All kwargs are passed as replacements such that `{{key}} => value` in the template.}}"
function render(prompt::PromptTemplate; kwargs...)
    conversation = Dict{String, String}[]
    !isnothing(prompt.system_prompt) &&
        push!(conversation, Dict("role" => "system", "content" => prompt.system_prompt))
    # Replace any handlebar-style placeholders like `{{key}}` in the user_prompt with user-provided kwargs
    user_prompt = replace(prompt.user_prompt, ["{{$(k)}}" => v for (k, v) in kwargs]...)
    push!(conversation, Dict("role" => "user", "content" => user_prompt))
    return conversation
end

"Builds the request to the API and waits for the response."
function aigenerate(template::PromptTemplate;
        api_key::String = API_KEY,
        model::String = MODEL_CHAT,
        # Let's use smart defaults because OpenAI is a bit fiddly...
        http_kwargs::NamedTuple = (;
            retry_non_idempotent = true,
            retries = 10,
            readtimeout = 30), api_kwargs::NamedTuple = NamedTuple(),
        kwargs...)
    ##
    conversation = render(template; kwargs...)
    time = @elapsed r = create_chat(api_key,
        model,
        conversation;
        http_kwargs,
        api_kwargs...)
    return AIMessage(; content = r.response[:choices][begin][:message][:content] |> strip,
        status = Int(r.status),
        tokens = (r.response[:usage][:prompt_tokens],
            r.response[:usage][:completion_tokens]),
        elapsed = time)
end
"Creates embeddings for `docs` (string or array of strings) and returns a normalized matrix (column-wise)"
function aiembed(docs::Union{AbstractString, Vector{<:AbstractString}},
        postprocess::F = normalize;
        api_key::String = API_KEY,
        model::String = MODEL_EMBEDDING,
        http_kwargs::NamedTuple = NamedTuple(), api_kwargs::NamedTuple = NamedTuple(),
        kwargs...) where {F <: Function}
    r = create_embeddings(api_key, docs, model; http_kwargs, api_kwargs...)
    return mapreduce(x -> postprocess(x[:embedding]), hcat, r.response.data)
end

"Finds the indices of chunks (represented by embeddings in `emb`) that are closest (cosine similarity) to query embedding (`query_emb`). Returns only `top_k` closest indices."
function find_closest(emb::AbstractMatrix{<:Real},
        query_emb::AbstractVector{<:Real};
        top_k::Int = 100)
    query_emb' * emb |> vec |> sortperm |> reverse |> x -> first(x, top_k)
end
function find_closest(index::ChunkIndex, query_emb::AbstractVector{<:Real}; top_k::Int=100)
    find_closest(index.embeddings, query_emb; top_k)
end
Explanation:
- render: To process and format prompts for the AI.
- aigenerate: For generating AI responses using the provided prompt template.
- aiembed: To create and normalize embeddings for the provided document chunks.
render Function
The render function is essential for formatting and preparing prompts for the AI, allowing the integration of dynamic content and user inputs into the chatbot's conversation flow. For example, if we have a PromptTemplate with placeholders, render can replace these placeholders with actual user queries or context, creating a customized prompt that the AI can respond to effectively.
Suppose you have a PromptTemplate defined as follows:
template = PromptTemplate(system_prompt = "You are a knowledgeable assistant.",
                          user_prompt = "How do I create a DataFrame with {{package}} in Julia?")
Now, let's say you want to ask about performing a specific action with a specific package, like "create a DataFrame with DataFrames.jl". You would use the render function to insert the package name into the user prompt:
rendered_prompt = render(template, package = "DataFrames.jl")
This would result in the user_prompt being updated to: "How do I create a DataFrame with DataFrames.jl in Julia?", which is then ready to be used as a part of the chatbot's conversation flow. Moreover, it would be already in the correct "message" format for OpenAI API:
2-element Vector{Dict{String, String}}:
 Dict("role" => "system", "content" => "You are a knowledgeable assistant.")
 Dict("role" => "user", "content" => "How do I create a DataFrame with DataFrames.jl in Julia?")
aigenerate Function
The aigenerate function is pivotal in our RAG setup as it interfaces with the AI model to generate responses based on the provided prompts, effectively turning the retrieved and formatted information into coherent and contextually relevant answers. It acts as the bridge between the retrieval phase of relevant information and the generation of an appropriate response, ensuring the chatbot's interactions are both informative and context-sensitive.
msg = aigenerate(PromptTemplate(;user_prompt="Say hi five times."))
println(msg.content)
# Output: Hi! Hi! Hi! Hi! Hi!
aiembed Function
The aiembed function converts text into numerical embeddings, allowing the system to measure the relevance of different text chunks. This numerical transformation is crucial for identifying the most relevant content to provide as context in response generation, ensuring accuracy and context-awareness in the chatbot's replies.
emb = aiembed("Turn me into numbers.")
# Output:
# 1536-element Vector{Float64}:
#  -0.03651317710545448
#  -0.027319023827096944
#   0.010491611317638715
#  -0.009615663291118957
#  -0.008002076242266813
#   0.009846176298097852
#   ⋮
#   0.013593650411554484
#  -0.0029900763905260403
#  -0.008403826754430006
#   0.007824252236883102
#   0.0004231550728112289
#  -0.02734536782789452
This is great. Now we can compare the "similarity" of text by simply multiplying and summing these vectors:
sum(emb .* emb) == 1.0 # similarity to itself is exact, so it should be 1.0
# it's the same as dot(emb, emb), because the above is just a "dot product"
Let's try a different sentence:
emb2 = aiembed("I like Cauliflower, but it must be grilled.")

# similarity between two different texts
sum(emb .* emb2) # 0.73 --> smaller than 1.0 because it's less similar
Try a few different sentences to see how the similarity changes. This is effectively what function find_closest does across the ChunkIndex - it finds the closest chunks to the query.
Data Preparation and Chunking
This assumes you've already downloaded several pages (eg, 5?) from the DataFrames.jl documentation and saved them as separate text files in a folder documents/. If you haven't, do it now! Remember, garbage in, garbage out!
Loading and Chunking Data
We load text data and split it into manageable chunks for efficient processing.
"Splits `doc` into text chunks of size at most `max_size` (in characters), ie, it accumulates smaller chunks to match the desired size"
function build_chunks(doc::AbstractString;
        max_size::Int = 128,
        split_pattern::Union{String, Regex} = r"\n|\. ",
        join_key::String = "\n")
    ## shortcut if doc is too short
    length(doc) < max_size && return [doc]
    ## proceed
    texts = split(doc, split_pattern)
    doc_chunks = Vector{eltype(texts)}()
    start, counter = 1, 0
    # accumulate chunks until we reach the max size
    for i in eachindex(texts)
        l = length(texts[i])
        # if it doesn't fit, we push all preceeding docs, reset the counter and start a new chunk
        if l == 0 || (counter + l >= max_size)
            push!(doc_chunks, join(texts[start:max(i - 1, 1)], join_key))
            start = i # current text becomes the next chunk
            counter = 0
        end
        counter += l
    end
    # last chunk is never pushed in, so we need to do it manually
    push!(doc_chunks, join(texts[start:end], join_key))
    return doc_chunks
end
Explanation:
- build_chunks: Splits the document into smaller text chunks, essential for effective retrieval and embedding.
The build_chunks function is crucial because it breaks down full documents into smaller, manageable pieces, ensuring that each piece fits within the model's "context window." Without this function, entire documents might overwhelm the model with too much information, exceeding its capacity to process and interpret effectively.
A quick demonstration of how it works:
doc = """
One wisdom.


Second wisdom.


Third wisdom.
"""
build_chunks(doc; max_size = 20)
# Output:
# 6-element Vector{SubString{String}}:
#  "One wisdom."
#  ""
#  "\nSecond wisdom."
#  ""
#  "\nThird wisdom."
#  ""
We just split a larger document into 3 chunks, each of which is at most 20 characters long.
Embedding and Index Creation
Here, we "embed" the chunks and create a ChunkIndex for retrieval purposes. See the aiembed section above to understand what it does.
dir = joinpath("documents") # this is where the files are saved
files = ["comparison_with_python.txt", "database_style_joins.txt", "what_is_dataframes.txt"]
labels = ["DataFrames-Python", "DataFrames-Joins", "DataFrames-WhatIs"]

indices = ChunkIndex[]
for (fn, lbl) in zip(files, labels)
    doc_raw = read(joinpath(dir_raw, fn), String)
    # split into chunks, if you want to start simple - just do `split(text,"\n\n")`
    doc_chunks = build_chunks(doc_raw; max_size = 256, split_pattern = "\n\n") |>
                 texts -> mapreduce(x -> build_chunks(x;
            max_size = 256,
            split_pattern = r"\n|\. "),
        vcat,
        texts)
    # Notice that we embed all doc_chunks at once, not one by one
    # OpenAI supports embedding multiple documents if they are short enough, ie, it's only because the documentation pages are small
    embeddings = aiembed(doc_chunks) .|> Float32
    index = ChunkIndex(;
        embeddings,
        chunks = doc_chunks,
        sources = fill(lbl, length(doc_chunks)))
    push!(indices, index)
end
index = reduce(vcat, indices) # combine it across several documents
Explanation:
- Loop Over Documents: For each document, it loads the text, breaks it into chunks, and computes embeddings.
- ChunkIndex Creation: Forms a structured index of these chunks along with their embeddings for later retrieval.
Interactive RAG Example
Setting up a template for AI responses and demonstrating retrieval and generation process:
# Define a template for our RAG system
rag_template = PromptTemplate(;
    system_prompt = "Act as a world-class AI assistant and an expert in Julia language. Answer the question based only on the provided context. Be brief and concise.",
    user_prompt = """
      # Context

      {{context}}

      # Question

      {{question}}

      # Answer
      """)

# user question
question = "I like dplyr, what is the equivalent in Julia?"
question_emb = aiembed(question)

# Build the context of similar docs -- take the top 3 closest chunks
idxs = find_closest(index, question_emb; top_k = 3)

# We add 2 chunks before and after each of the closest chunk
close_chunks = [join(index.chunks[max(begin, i - 2):min(end, i + 2)], "\n")
                for i in idxs]
answer = aigenerate(rag_template;
    question,
    context = join(close_chunks, "\n\n"))
println(answer.content)
In this section, we're putting together the RAG chatbot's response generation process using the previously defined components.
Explanation:
-
Setting Up the Prompt Template:
rag_templateis created with a specific instruction for the AI to act as an expert in the Julia language, ensuring responses are focused and relevant. It includes placeholders for dynamic context and the user's question. -
Processing the User Question: The user's question, "I like dplyr, what is the equivalent in Julia?", is converted into an embedding using
aiembed. This numerical representation is used to find relevant information. -
Retrieving Relevant Context: The
find_closestfunction calculates the closeness of each chunk in our indexed database (created usingChunkIndex) to the question embedding. We select the indices (idxs) of the top 3 closest chunks. - Building Contextual Information: For each of the top chunks, we expand the context by also including two preceding and following chunks. This enriches the context, making the AI's response more informed.
-
Generating the Answer: The
aigeneratefunction then takes this context, along with the user's question, to generate a response. Therag_templateguides the response format. -
Outputting the Response: Finally, the generated response (
answer.content) is printed out, providing an informed and contextually relevant answer to the user's question based on theDataFrames.jldocumentation.
Try a few different questions to see how the chatbot responds. Inspect all the intermediate variables.
End-to-End Example
Here we demonstrate a complete process for asking a specific question and obtaining an answer through the RAG system.
First, let's wrap the whole process into a function:
"RAG wrapper that answers the given question and inject the context if needed from `index`"
function airag(index::ChunkIndex, rag_template::PromptTemplate;
        question::AbstractString, top_k::Int = 3, kwargs...)
    question_emb = aiembed(question;)

    idxs = find_closest(index, question_emb; top_k)
    # We add 2 chunks before and after each of the closest chunk
    close_chunks = [join(index.chunks[max(begin, i - 2):min(end, i + 2)], "\n")
                    for i in idxs]
    return aigenerate(rag_template;
        question,
        context = join(close_chunks, "\n\n"),
        kwargs...)
end
Now, we can use it to ask a question:
question = "I like dplyr, what is the equivalent in Julia?"
answer = airag(index, rag_template; question)
Yay! We got an answer! Let's see what it is:
The equivalent package in Julia for dplyr in R is DataFramesMeta.jl. It provides convenience syntax similar to dplyr for advanced data transformations.
Success!
Conclusion
Through this tutorial, you've learned how to build a RAG chatbot in Julia, starting from making direct API calls to constructing the full chatbot system. This approach emphasizes the significance of retrieval in enhancing the performance of generative models and highlights the importance of systematic evaluation and improvement. Now, you're equipped to experiment with and refine your own RAG chatbot, tailoring it to your specific needs and data.
That was long! If you made it this far, congratulations! You're now ready to build your own RAG chatbot in Julia. Stay tuned for Part 2 of this tutorial, where we'll explore a more streamlined approach to building RAG chatbots using PromptingTools.jl.
If you don't want to copy & paste all the code, you can get it all at once from this gist.
Want to Learn More?
- For any serious RAG system, you must first prepare an evaluation set of reference questions & answers (at least 50). You'll use them later for every change and decision (eg, “how big should my chunk size be”)
- Great tutorials and tips for building production-ready RAG: here and here. It will teach you about things like query rephrasing, re-ranking, etc.
- In practice, we would probably want to scrape all DataFrames.jl documentation automatically (to make it easy to update with future releases) and to serialize the ChunkIndex/embeddings to persist them in between REPL sessions.
Credit for the title image goes to DALL-E 3.
EDIT: Thanks to Jason Potas for pointing out that I forgot to include create_embeddings. That has been fixed now.

Top comments (0)