post original here
Introduction
In this post, we are going to discuss how to build your own blog with Julia and Franklin.jl, a popular static site generator among Julia users who create their own blogs or even build websites for tutorials. I hope that if you are reading this entry and you don't have your own space, it can motivate you to build your own website.
Some Reasons to Create Your Own Blog
Blogs may sound old-fashioned, something created by people who are still living in the 90s, typing with passion about the political system while listening to Soundgarden in the background and drinking some kind of cheap beer... or programmers. And because if you are reading this content, you're probably at least the second one, you should consider that having a blog is a nice way to:
- Track your progress in your field
- Generate content that can be useful for somebody else
- Help the open-source community with diffusion, tutorials, etc.
- Create your own space and adapt it you your needs
- Build your personal brand and help you to find a job
But why Franklin? Franklin is one of the most popular libraries for this purpose in Julia. It offers seamless integration with running Julia scripts so you can use julia for demostrations in your blog this could be harder with other static site generators. If you only want to create basic entries with some code and images, perhaps Franklin.jl might not be that different from Hugo or Jekyll.
Installation
The first step is to create a folder where you will save your project. Once you are ready, open the Julia REPL in the location where the folder should be. When it's ready, type ] to activate the package manager and then type:
(@v1.9) pkg> add Franklin
then, return to the Julia Repl and import the library:
julia> using Franklin
Remember to make sure you have successfully installed the Franklin library before trying to import it.
First Steps
To create your website, you can choose one of the templates available. In my case, I just used the basic one, but if you have a different preference, feel free to go ahead; they all follow similar structures. You can also import another template that you like more and adapt it to your website. Please read the documentation for instructions on how to do this.
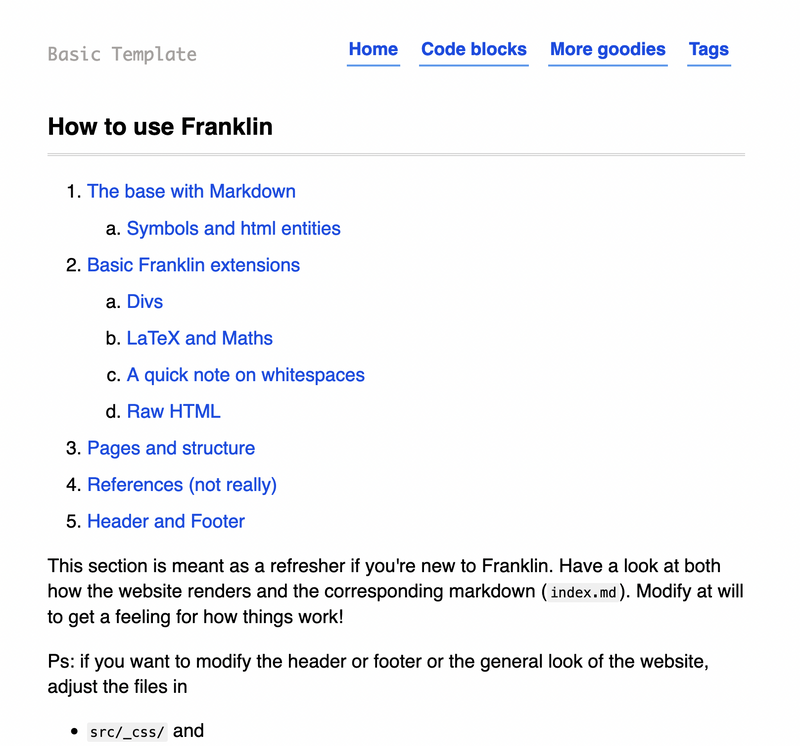
Selecting a template
Once you have decided your template, type in the REPL the next instruction
julia> newsite("myBlog", template="basic") #you can choose another name and template
This will create a folder with various directories and elements. It will also activate the environment inside the project. So, if you verify the project with ], it should display the name of your project.
.
├── 404.md            # Page for error 404
├── Manifest.toml     # The typical toml files for Julia development project
├── Project.toml
├── __site            # Generate your full website.
├── _assets           # You can add pictures and images here
├── _css              # All related to styling your website
├── _layout           # All related to the structure of your website
├── _libs             # Here will go all elements for website like katex, searchbar, etc
├── _rss              # A couple of files related to rss feed,
├── config.md         # Set Global variables for your website
├── index.md          # Main landing page
├── pages.md          # All your pages / you can create your folder or organize in different way
└── utils.jl          # Julia File for setting some configurations
Finally type:
julia> serve()
It should open your website locally in the browser, and it should look exactly the same as the template website you chose.
From this point, it's time to delete some files and content. You might also want to add some pages for your projects, about, contact, etc. This is up to you, but for now, we are going to keep just 2 pages: one for the main "about" page and another to host all your posts.
Cleaning the template
Now, go to the "index.md" page and delete all its content. This page will become your main page, and you can mix HTML and Markdown in this file to add whatever you want to it.
# Welcome to my blog
## I am using Franklin

~~~
    <img src="/assets/rndimg.jpg" height="300" class="main-picture" >
    <p>
    <p>
~~~


This is an introductory message
You might have noticed that in our main page, there are four links to different pages. You can choose to keep those links or delete them all. However, for the purpose of creating a blog section, let's use one of those links. To do that, follow these steps:
- Go to the "header.html" file located in the "layout" folder.
- Modify the code in the "header.html" file to something like this:
<header>
<div class="blog-name"><a href="/"></a>Amazing Blog</div>
<nav>
  <ul>
    <li><a href="/">Home</a></li>
    <li><a href="/menu1/">Blog</a></li>
  </ul>
  <img src="/assets/hamburger.svg" id="menu-icon">
</nav>
</header>
If you're looking to change the background color to something more interesting than white, now is the time to showcase your frontend skills. Follow these steps:
- Navigate to the "franklin.css" file.
- In the first block of code, add the background color that you prefer. For instance:
:root {
  --block-background: hsl(0, 0%, 94%);
  --output-background: hsl(0, 0%, 98%);
  --small: 14px;
  --normal: 19px;
  --text-color: hsv(0, 0%, 20%);
    background-color: aqua;
}
Finally, after making these modifications, the result should look something like this:

Creating your first post
Now, if you're ready to start your own blog, here's how you can set up the "posts" folder to add your articles, create a new folder named "posts" in the same root directory as your other folders. Is important to consider this things.
- Inside the "posts" folder, you can add all your articles. You have the flexibility to use both Markdown files and HTML files for your articles.
- If you're doing literate programming with tools like Pluto or Jupyter, you can export your notebooks to HTML format and place them in the "posts" folder. This way, anyone can easily view your data science projects.
For now, let's add a file called test1.md inside the posts folder and you can add some text
# This is a title in my first post

So I can write anything

## Here is an introduction

We are going to write some code:

using LinearAlgebra
a = [1, 2, 3, 3, 4, 5, 2, 2]
@show dot(a, a)
println(dot(a, a))
Then, go to the menu1.md file, erase the remaining content, and create a link to the test1.md file. This is as simple as:
* [This is the title of my blog](../posts/test1)
If you save it, and navigate to http://localhost:8000/posts/test1/, you should see your post displayed clearly. This page will include your "about" section and the space to write your blog content. Congratulations! You now have a basic understanding of how Franklin works and can make any further edits or modifications you desire.
If you wish to further style your website, please go ahead and customize it to your heart's content.
Deployment
Now it's time to host your website in some place. One of the most straightforward options is using GitHub. Here's how you can do it:
-
Create a Repository: Go to your GitHub account and create an empty repository. When entering the name of your project, you have two paths to choose from:
a. If this is a personal website or organization, the name of your project should be something like
username.github.io.b. You can create your own custom name for your project, like
myblog.
If you're unsure which option to choose, I recommend going with option (a) because it's more straightforward. If you choose option (b), you'll need to define a prepath variable in your config.md with the name of that project. For instance: @def prepath = "myblog".
Upload Your Project: Now upload your project to GitHub, following the instructions in your repository.
Configure GitHub Pages: Once you've pushed your project, go to the
Settingstab in your repository. Then navigate toGitHub Pages. In the Source dropdown, selectgh-pages. If you see a message indicating success, your project is now live.Check Your Website: You can now open your web browser and enter the link of your project, which would be
username.github.io. If you can see your website, congratulations! Your blog is now live on the internet.
By following these steps, you've successfully hosted your Franklin-generated website on GitHub Pages. It's now accessible to anyone with the link, and you can share your content with the world.
Hosting in a different domain (optional)
If you're hesitant to share your GitHub username due to its lengthy or unconventional extension, or if you prefer a more professional-looking link, you might want to consider an alternative domain, such as .com or .dev. You can purchase a domain and link it to your website. For example, you can use services like Google Domains to find and purchase a domain that suits your preference.
Once you've found and acquired the domain you like, you can proceed to link it to your website. To do this, you need to configure the DNS settings. You can find detailed explanations about custom domains and GitHub Pages in the documentation. In a nutshell, follow these steps:
- Go to Google Domains, select your domain, and navigate to the DNS section.
- Configure the DNS records, as shown below:
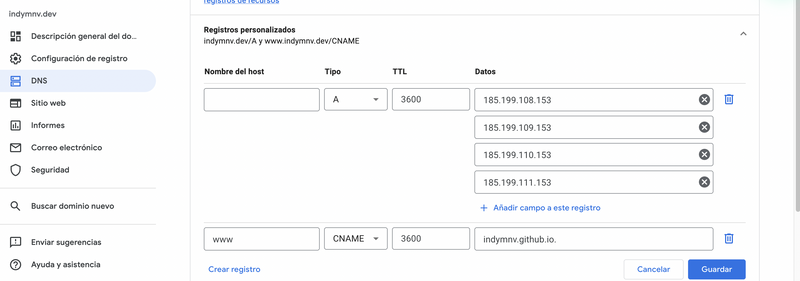
- After correctly setting up the DNS records, go to your GitHub project repository's settings, then navigate to Pages and enter your custom domain:
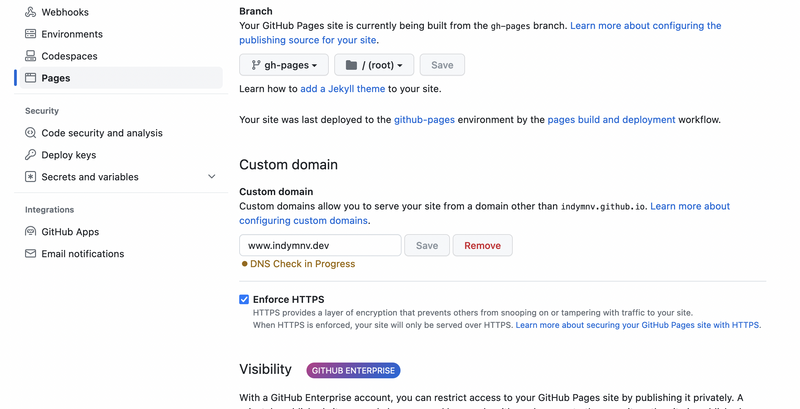
- If everything is set up correctly, GitHub will confirm the configuration. In a few minutes, your website should become accessible via your new custom domain.
By following these steps, you'll be able to link a custom domain to your Franklin-generated website, providing a more personalized and professional web presence.
RSS and Tags
Now that your website is up and running, setting up an RSS feed is important for people who want to stay updated on your new articles without having to visit your website daily. Tools like Newsboat or Inoreader help users keep track of updates from various websites, making an RSS feed a valuable addition to your blog.
Thankfully, Franklin makes setting up an RSS feed quite simple. All you need to do is go to each page in your "posts" folder and add a small description within +++ brackets, like this:
+++
tags = ["Julia", "Writing"]

rss_title = "Creating your own blog with Julia and Franklin"
rss_description = "Describing the steps to create your own blog, so you can stop posting your code on Instagram"
rss_pubdate = Date(2023, 8, 10)
+++
The RSS fields you add will be included in the information extracted by platforms like Newsboat. From these applications, I can read the title, a brief description, and the publication date and all the content if it's available. Additionally, you'll notice a "tags" section. This is also important because it allows users to filter by topics. For example, if you write different blogs about topics ranging from Julia programming to analysis of Shakira's new songs, users can select the topics they're specifically interested in.
To share your blog's RSS feed, you'll need a URL like https://www.yourdomain.com/feed.xml. Make sure to prominently display this URL in your website so that readers can easily find and subscribe to your feed.
Host your Feed to JuliaBloggers (optional)
Lastly, if you're considering writing about Julia and want to contribute to the community, don't hesitate to share your work. Whether it's a calculator project, a website, a 2D game, or a cutting-edge machine learning algorithm, your contributions will help the Julia community grow and provide valuable insights for others to learn from.
Visit the JuliaBloggers Website and add your information. In the "Feed URL" field, you can use a URL similar to the first example you mentioned, like:
http://indymnv.dev/tag/julia/feed/
Once you've submitted this information, every time you publish a new post on your website, the community will be able to see it. If you want to test this process first, you can use an RSS reader like Newsboat or Inoreader to ensure that your updates are being picked up as expected.
Conclusions
I hope you enjoyed reading this article. If you haven't yet created your own website, I hope it serves as motivation to get started, whether you choose to use Franklin or another static site generator. Having your own online space to write about your interests and dive as deep as you like is a rewarding endeavor. Don't hesitate to embark on this journey and create a platform that showcases your passion and expertise. Happy blogging!
Acknowledgment
I also want to thank Thibaut Lienart, who is the main developer of Franklin. His work has been incredibly beneficial for the community.
Top comments (3)
Unfortunately, this tutorial did not work for me due to deployment issues. If anyone reading this is having similar issues, try Dabbling Doggo on youtube, episode 03x09. [(youtube.com/watch?v=fVBiLEtZB7A)]. Now that I have a site deployed, I can apply the tips learned from this article. Thank you for putting this article together.
Thank you for your feedback. Could you please specify the part of the deployment section where you encountered difficulties? I'd be happy to review it and make any necessary clarifications if I missed something.
Some comments may only be visible to logged-in visitors. Sign in to view all comments.