There are various tools available for developers to use for building and executing several commands. They include: Code Editors, Integrated Development Environment (IDE), and Notebooks. Each tool has its use case and purpose. The tool of special interest is the Notebook. A notebook is a type of programming editor that allows users to write, run, and debug code in an interactive environment. Notebooks are a great way to keep track of code, as they allow you to write code and see the output of your code in the same window.
Some of the benefits of using a notebook include: Support for multiple languages, Easy debugging, Rich output, and Collaboration.
In this article, we will explore the IJulia notebook, a powerful tool for data analysis and scientific computing.
What is IJulia?
IJulia is an interactive notebook environment powered by the Julia programming language. Its backend is integrated with that of the Jupyter environment. The interface is similar to that of the IPython environment which comprises of a web-based notebook interface similar to that of the IPython notebook. It is open-source and cross-platform.
IJulia environment can also be used by IPython and it allows for the interaction of Julia code on the web browser, including support for plotting, images, formatted text, and many more. If you’re familiar with Jupyter Notebook, it would be easy to use the IJulia notebook as they both have the same interfaces.
Why use IJulia?
IJulia combines the power of the Julia language with the interactivity of the Jupyter notebook interface. Using IJulia as a code editor and a Julia developer serve the following purposes:
It enables users to build and debug code as well as evaluate and visualize data.
IJulia makes it easy to quickly get started with Julia without having to install any additional software or libraries.
It provides an intuitive interface for coding and data visualization, making it a great choice for those looking to get started with data science.
Getting Started with IJulia
This section would be going through the process of getting started with the IJulia notebook.
Installation
To begin with IJulia, the Julia Language has to be downloaded first. If Julia is already installed, this part can be skipped. After installing Julia, head over to the Julia REPL and type in the following commands
julia> using Pkg
julia> Pkg.add("IJulia")
Another method of installation is by entering the pkg mode by typing in ] in your terminal and then add IJulia
(@v1.8) pkg> add IJulia
Note: To exit the package terminal, simply hit the backspace button.
Any of the commands install IJulia and the kernel specification that tells Jupyter how to launch Julia. For more in-depth information about the installation process, visit the manual installation page.
Running IJulia
After installing it to your taste and style, you can now run IJulia. In the IJulia REPL and type in the following commands with the julia> prompt
using IJulia
notebook()
This would launch the notebook in your default browser. The first time you run the notebook() command, it is going to ask for permission to install Jupyter. Hit on enter to allow it to use the Conda.jl package access Miniconda to install a minimal Python/Jupyter distribution. For more information on how to customize how to run IJulia on your Operating System or local machine, visit the documentation page on how to run IJulia.
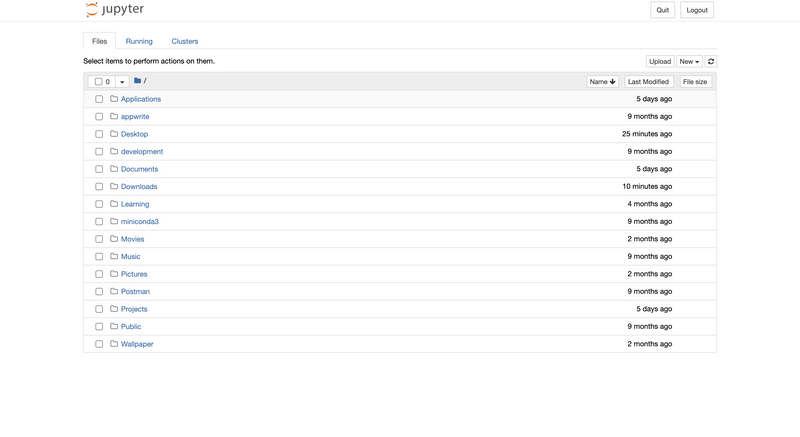
It should bring up a webpage similar to this
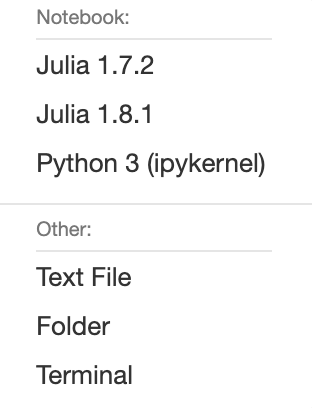
Clicking on the “New” dropdown would give you options for the available notebooks. For example, I have Notebooks Julia 1.7.2 and 1.8.1 installed. There is also a Python3 notebook available.
Operations in IJulia
In this section, some basic operations that can be done in the IJulia environment would be discussed. To begin, create a New Notebook - New → Julia (version_name), in my case Julia 1.8.1.
-
Printing “Hello World”
In the new notebook created, click on the first cell and type in
println("Hello, World!")Run the cell with the “Run” option or use the shortcut “Shift+Enter” on Windows or Mac. Your result would be in the format
Now. you’ve printed a Julia code in your notebook! Let’s move on to writing a function. -
Writing a Function
In the next cell, let’s declare a function that takes a list and returns a new list with unique elements of the first list.
function uniquelist(list)
    new_list = Set{}()
    for el in list
        push!(new_list, el)
    end
    return collect(new_list)
end
Take, for example, a list
[1,1,2,3], this would return the list of unique numbers i.e.[1,2,3].
Let’s plot a graph now.
-
Plotting a Graph
Like it was stated earlier, IJulia supports plotting. For this purpose, the Plots.jl library would be used. To add the Plots.jl package, go to a new cell, and type in the following
using Pkg
Pkg.add("Plots")
This would begin the process of downloading and installing the package.
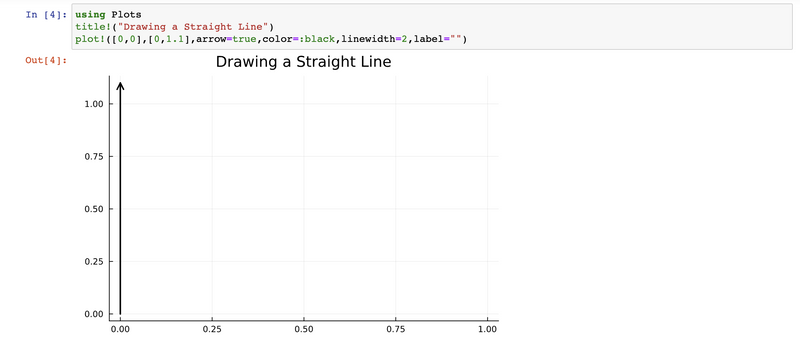
After downloading, let’s draw a line. The first step is to instantiate the package, then draw the line.
using Plots
title!("Drawing a Straight Line")
plot!([0,0],[0,1.1],arrow=true,color=:black,linewidth=2,label="")
Which would give a result below
To save a plot, use the
savefig()function to save the plot. This image of the plot is saved in the same directory of the notebook. For instance, if the notebook is in theDocumentsdirectory, the image of the plot would get saved in theDocumentsdirectory.
savefig("plot_name.png")Let’s plot the Lorenz Attractor from the Plots.jl documentation.
Which would give us a lovely GIF!
-
Viewing tables
IJulia also supports viewing and manipulating tables. To create a table, first install the DataFrames.jl package by running the following command in a new cell:
using Pkg
Pkg.add("DataFrames")
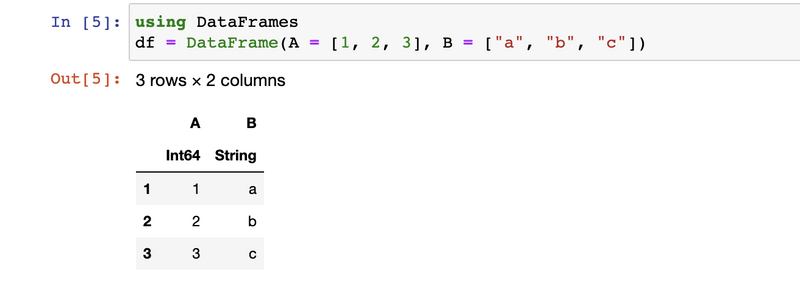
After installing the package, create a new cell and type in the following commands to create a new table:
using DataFrames
df = DataFrame(A = [1, 2, 3], B = ["a", "b", "c"])
This would create a table with two columns,
AandB, and three rows. To view the table, simply run the cell.
Many other operations can be carried out on the IJulia notebook like: Use of markdown and latex for text formatting and mathematical expressions, and importing and exporting data in various formats such as CSV, Excel, and JSON among others.
Conclusion
IJulia offers a powerful and interactive environment for developers to write, manage, and test code in the Julia programming language. Its integration with Jupyter and support for data visualization make it a great choice for data scientists and other researchers.
With IJulia, users can quickly get started with Julia without having to install any additional software or libraries, and benefit from the productivity and debugging tools that come with a code editor.






Top comments (4)
To save a plot you said
"To save a plot, use the savefig() to save"
savefig("plot_name.png")
But you failed to tell us where on the filesystem, the plot is saved. Please edit your post to let us know the exact location of the saved file.
Hi!
My bad about that. I have included that in the article now. I hope you enjoyed the article by the way :)
Great overview! Thank you for this work!
I'm glad you could understand it