Interactive notebooks are a computational interface that permits users to produce and distribute code, data, and visualizations in a document-like format that allows for interactivity. They are often utilized in scientific computing, data analysis, and education.
Interactive notebooks typically have a web-based interface that allows users to create cells containing executable code, formatted text, and multimedia elements such as images and videos. Users can run individual cells or the entire notebook and view the output of their code inline with the input cells. This allows for an interactive and iterative workflow where users can experiment with different code snippets and immediately see the results.
In the Julia Language community, there exists an interactive notebook called Pluto. In this article, we will go over what the Pluto notebook is about, installing and performing several actions, and practical applications with Pluto.
What is Pluto.jl?
Pluto.jl is an open-source interactive and reactive notebook environment for the Julia programming language. It was written in Julia and developed by the Julia community. It uses a reactive programming model, so as the input code cells are changed, the output cells of the notebook immediately update in real-time. This makes it possible for users to interact with the workflow and experiment with code while seeing the results instantly without restarting the notebook.
The interface is designed to be simple and intuitive, focusing on enabling users to quickly and easily explore and analyze their data. It has a more user-friendly and responsive alternative to notebook environments such as Jupyter Notebook and IJulia.
Pluto notebooks include a built-in package manager that makes adding and managing Julia's packages in the notebook environment simple. The package manager, based on the Julia Pkg standard library package, offers a practical way to install, update, and uninstall packages from within the notebook.
Differences between Pluto.jl and IJulia
Pluto.jl and IJulia are both notebooks used in the Julia ecosystem, but there are some differences between these two. This includes:
User Interface: Pluto.jl has a more intuitive and friendly interface than IJulia. This makes it easier for users to focus on the work than the interface.
Live editing: Pluto.jl supports live editing in the output cells without modifying the original cell code. This makes it easier to experiment with different values and parameters and see the results in real time.
Automatic Dependency Tracking: With Pluto.jl, it automatically detects when a cell needs to be re-evaluated based on the changes in other cells. This makes it so users don't have to run cells or keep track of dependencies manually, and the notebook is always up to date.
Getting started with Pluto.jl
In this section, we will be going through installing and setting up Pluto.jl.
Installing
To start with Pluto.jl, the Julia Language must be downloaded first. If Julia is already installed, this part can be skipped. The next step is to download Pluto.jl. Load the Julia REPL and type in the following commands
using Pkg
Pkg.add("Pluto")
This might take a couple of minutes. Another method of installation is by entering the pkg mode by typing in ] in your terminal and then add Pluto
(@v1.8) pkg> add Pluto
Note: If your Mac uses the Apple chip, creating an environment before installing Pluto is advisable to avoid errors upon starting.
Note: To exit the package terminal, hit the backspace button.
Running
After installing Pluto, the next step is to run Pluto on our local machine. In the Julia REPL, type the following commands
import Pluto
Pluto.run()
This will load up Pluto and automatically open in the default browser when it is up. It should bring up a webpage similar to this.
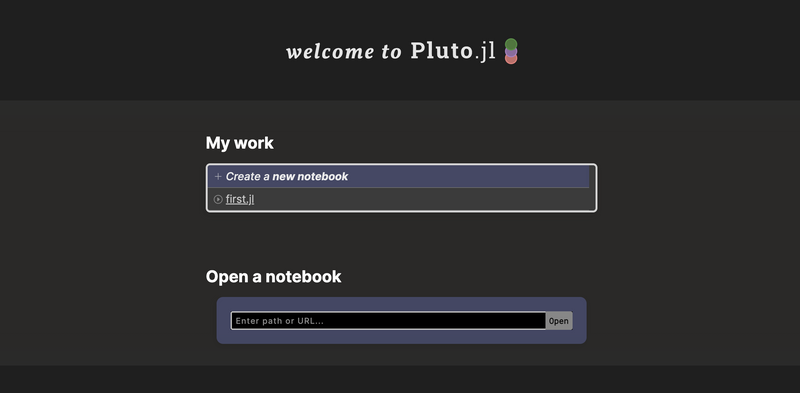
A new workbook can be created by clicking on the “Create a new workbook” option. The new workbook design would look like this.
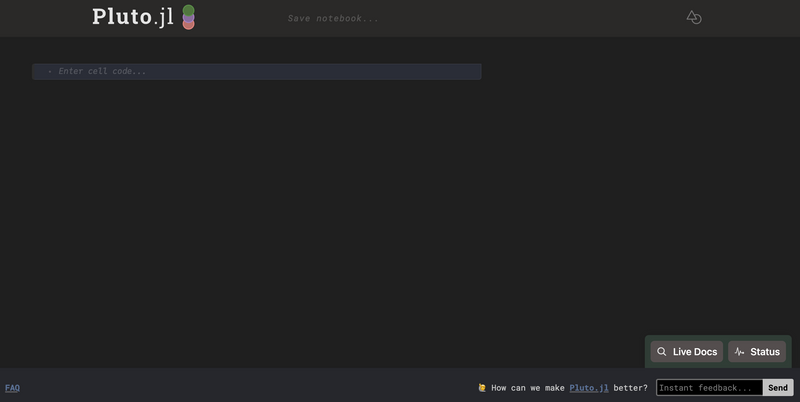
To save the notebook, click on “Save notebook” and type in the desired name of the notebook. The notebook's location can also be changed by hovering over the name and clicking the “Move” button.
Operations in Pluto
This section will discuss some basic operations that can be achieved in the Pluto environment.
-
Printing “Hello World”
As usual, let’s print the famous “Hello World” in the notebook. Type in
println("Hello World!")Run the cell with the play button or use the shortcut “Shift+Enter” on Windows or Mac. Your result would be in the format.
Let’s move on to printing a function.
-
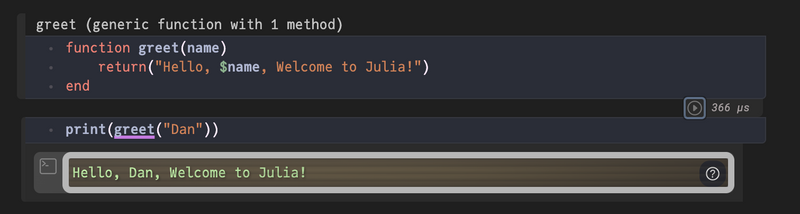
Writing a function
Let’s create a custom function that takes in the name of a user and welcomes the user to Julia.
The
printstatement could have been put inside the same cell as the function, but Pluto allows separating and running both simultaneously.


Reactive and Interactive Programming in Pluto
Reactive programming is a paradigm used in Pluto.jl to provide an interactive and responsive notebook environment. In reactive programming, the output of a program is automatically updated whenever there is a change in the input data or state.
In Pluto, code and output cells are implemented as reactive expressions. As a result, when a code cell is changed, all related output cells are also automatically updated.
For example, suppose a code cell defines a variable x and an output cell displays the value of x. Whenever you modify the value of x, the output cell will automatically update to display the new value.

PlutoUI.jl
PlutoUI.jl is a Julia package that provides functions and macros for building interactive user interfaces in Pluto notebooks. It was designed to work with Pluto, allowing users to create UI elements that automatically update in response to changes in their underlying data.
PlutoUI can allow you to use the @bind macro. The @bind macro allows one to bind a UI element (such as a button, slider, or checkbox) to a Julia variable so that changes in the UI element automatically update the variable's value. Some of its key features of Julia are:
A rich set of UI components, including buttons, sliders, checkboxes, and text inputs.
A flexible layout system allows users to arrange UI elements in various ways.
Seamless integration with Pluto's reactive programming model allows users to create reactive UI elements that update in real-time.
To get started with PlutoUI, import the package into the notebook and let the built-in package manager handle the rest
using PlutoUI
Let’s create a slider in the notebook
@bind y Slider(5:15)
This would give us the following:

Now, interacting with the slider would provide something like this:

Notice how the value of y changed while the slider moved from left to right.
Another instance is using the @bind macro to create a clock with intervals.
@bind a Clock()
Adding 1 second per tick would give:

Advanced Features and Tools in Pluto
Apart from creating little UIs and writing code in Pluto, there are other features that Pluto provides. This includes:
Inline plotting and Visualization
To use inline plotting in Pluto, you can create a plot object using the Plots.jl package and then include it in a code cell using the @show macro. For example:
using Plots

x = 0:0.1:2π
y = sin.(x)

plot(x, y)
@show
Which would give

Automatic dependency tracking and code execution order
One of the benefits of using Pluto notebooks is that they automatically track dependencies and execute cells in the correct order. When a cell is executed, Pluto checks all of the variables used in that cell and determines which other cells need to be executed first to ensure that all of the required variables are defined.
# Cell 1
x = 1

# Cell 2
y = x + 1

# Cell 3
println(y)
When we execute Cell 3, Pluto will first execute Cell 1 to define x and then execute Cell 2 to define y in terms of x. Finally, it will execute Cell 3 to print the value of y.
This automatic dependency tracking can be beneficial when working on complex projects with many interrelated variables and functions. It ensures that the code is executed in the correct order and reduces the risk of errors caused by undefined variables.
In addition, Pluto notebooks provide a visual cue to indicate whether a cell is up-to-date or needs re-executing. If a cell is up-to-date, it is displayed with a green border. If a cell is out-of-date, it is shown with a red border and a "Run" button that can be used to re-execute the cell.
Integration with external packages and libraries
Pluto notebooks can easily integrate with external packages and libraries in Julia. Since Pluto notebooks are just Julia code, any package that can be used in Julia can also be used in a Pluto notebook. Pluto notebooks can also use external libraries and packages not written in Julia as long as they are accessible from the Julia environment. For example, you can use Python libraries in a Pluto notebook using the PyCall.jl package to call Python functions from within Julia. This can be particularly useful for data science applications where Python has a rich ecosystem of scientific libraries.
Practical Applications of Pluto.jl
Pluto notebooks have a variety of practical applications across many fields. Here are a few examples of the application of Pluto:
Data Analysis and Visualization: Pluto's reactive programming and built-in plotting capabilities make it an excellent data analysis and visualization tool. Scientists and analysts can use Pluto to interactively explore and visualize data in real-time, making it easier to identify patterns and relationships.
Education: Pluto's interactive nature and ability to provide instant feedback make it an excellent tool for teaching programming concepts. Teachers can create Pluto notebooks with exercises and code examples that students can interact with and modify in real-time.
Prototyping and experimentation: Pluto's quick feedback loop and ability to quickly iterate on code make it an excellent tool for prototyping and experimentation. Scientists, researchers, and engineers can quickly use Pluto to build and test ideas without complex software development workflows.
Machine learning: Pluto's ability to integrate with external libraries and packages, along with its reactive programming and visualization capabilities, make it an excellent tool for developing and testing machine learning models.
Web development: Pluto's ability to generate HTML and JavaScript output makes it an excellent tool for developing and testing web applications. Developers can use Pluto to quickly prototype and test web application UIs and functionality without needing an entire development environment.
These are just a few examples of the practical applications of Pluto notebooks. As an interactive and reactive programming environment, Pluto can be used in various fields and industries where quick feedback loops and interactive development are critical.
Benefits and limitations of using Pluto for different types of projects
Pluto offers several benefits for different types of projects. For data science projects, Pluto provides an interactive environment that allows for easy data exploration and visualization. The reactive programming features of Pluto also make it easy to create interactive visualizations and dashboards. For teaching and learning, Pluto's notebook interface makes it easy to create interactive lessons and tutorials. Additionally, Pluto's built-in package manager and automatic dependency tracking make it easy to manage project dependencies and ensure reproducibility.
However, Pluto's limitations may make it less suitable for specific projects. For large-scale projects with complex code, the lack of traditional code files may make navigating and organizing the codebase easier. Additionally, Pluto's emphasis on interactivity may make it less suitable for projects that require long-running computations or batch processing. Finally, Pluto's relatively new and evolving status may make it less ideal for projects requiring high stability and backward compatibility.
Conclusion
Pluto is a modern and powerful notebook interface for Julia that offers some key features and benefits. These include automatic dependency tracking, built-in package management, reactive programming, inline plotting, and a customizable notebook layout. Pluto's interactive and responsive interface makes it well-suited for a wide range of scientific computing applications, including data exploration and visualization, teaching and learning, and interactive dashboards.
Looking to the future, Pluto's development team is actively working on new features and improvements. Additionally, Pluto's success and popularity are helping to drive growth in the Julia ecosystem as a whole, with new packages and libraries being developed to support and extend Pluto's capabilities.
To learn about Pluto extensively, you can visit the official website to learn more about what it offers. The featured notebooks are a great way to learn about Pluto's capabilities.
In conclusion, interactive and responsive notebooks like Pluto are becoming increasingly important for scientific computing as they enable users to explore, visualize, and analyze data in real-time. As scientific computing continues to evolve and become more complex, tools like Pluto will play an increasingly important role in enabling researchers and practitioners to work more efficiently and effectively.

Top comments (0)