In this post, we will learn how to read/write videos and capture videos from a camera source all using VideoIO.jl and some other packages like GLMakie.jl, ImageView.jl, and StackViews.jl. GLMakie.jl and ImageView.jl are mainly being utilized for visualization purposes.
Let’s start by installing the packages we want to use:
julia> ] add VideoIO, GLMakie, ImageView, StackViews
Now we’re ready to learn about this topic, YAY!!!! 😄
Reading and Displaying Video data 🌅
For working with VideoIO data, we will be mainly using VideoIO.jl, explore its documentation to find more information:
VideoIO.jl is popularly used for reading and writing video files in Julia. It’s supported by a dedicated build of FFMPEG using Julia’s binary distribution method through YggDrasil. More details on YggDrasil can be found in this link.
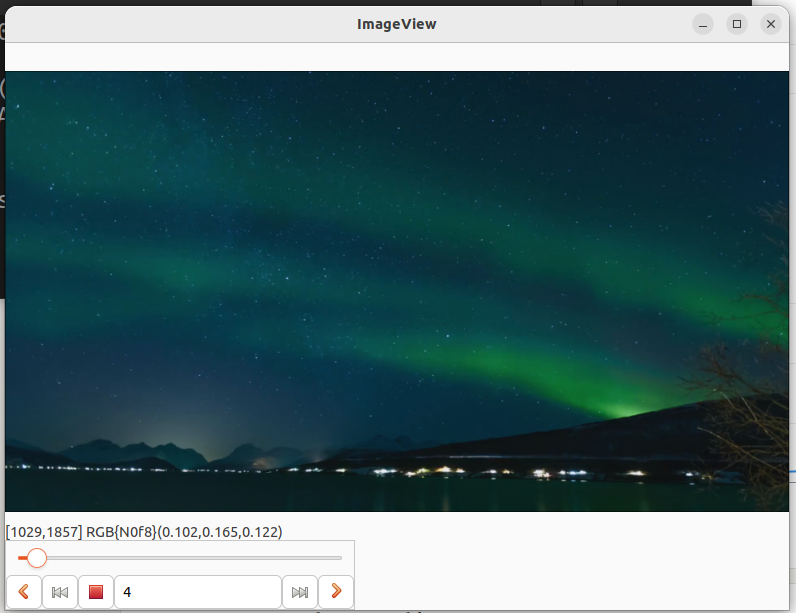
We will be using the below shown video for this blog post:
NOTE : VideoIO.jl also provides test videos which might be easier to work with. More details can be found here. Also big thanks to wedistill.io where I found the above shown video, wedistill.io provides free stock HD videos which is pretty helpful.
julia> using VideoIO

# julia> vidio = VideoIO.open("input.mp4")
julia> vid = VideoIO.load("input.mp4")
124-element Vector{PermutedDimsArray{ColorTypes.RGB{FixedPointNumbers.N0f8}, 2, (2, 1), (2, 1), Matrix{ColorTypes.RGB{FixedPointNumbers.N0f8}}}}
If we use VideoIO.open then we construct a AVInput object to access the video and audio streams in a video container.
VideoIO.load loads the filename into memory as vector of image arrays instead.
Let’s visualize/play video accessed from both of these ways in Julia:
- For IO method, we will use GLMakie.jl which is an OpenGL backend for Makie.jl(Major Plotting framework in Julia):
julia> using GLMakie

julia> VideoIO.playvideo(vidio)  # no sound
- For load method which loads video as an array of images, we use ImageView.jl, StackViews.jl to see the frames in the video.
julia> using ImageView, StackViews

julia> vid = StackView(vid)# to stack vector of images to [height, width, numimages]

julia> imshow(vid) # using ImageView
ImageView.jl and GLMakie.jl provide the plotting/display functionality but what’s the point of StackViews.jl? why did we apply it to our data before we passed the data to imshow().
To understand use of StackView, let’s see size of our data:
julia> vid = VideoIO.load("input.mp4");
# initially it loads vector of 2d images, so basically it has 124 images
# which we can calculate knowing the video was 4sec long, 4*30 approx
julia> size(vid)
(124,)

# size of each image : 1080 height and 1920 width
julia> size(vid[1])
(1080, 1920)

# for to be used with ImageView.jl, we want the dimension to be (height, width, numimages)
julia> vid = StackView(vid);

# guess what StackViews.jl does, so easy to use :)
julia> size(vid)
(1080, 1920, 124)
We see the utility of StackViews.jl and how it eases our job. Other options to do the exact same thing would have been using cat(vid…;dims=3), or using LazyStack.jl or in Julia 1.9, it would be using stack_iter which would provide similar functionality. Check out the documentation of StackViews.jl and LazyStack.jl to find more interesting information on this topic.
Reading input from camera 📷
In this section, we will learn how to access the webcam and use it for recording of video data.
Let’s get input from the camera and display on a screen, this data that’s being shown using Makie, can easily be processed and written to files as we will see.
The below shown example will start accessing webcam and showing it in GLMakie window. It’s well commented to help with understanding the example.
# to get access to camera handle which can be used  for accessing webcam data.
julia> cam = VideoIO.opencamera()

julia> imgstack = []

julia> secrec = 1

julia> frames = 30 * secrec

julia > framecounter = 0

julia> try
          # read the first image in start
          img = read(cam)
          obs_img = GLMakie.Observable(GLMakie.rotr90(img))
          scene = GLMakie.Scene(camera=GLMakie.campixel!, resolution=reverse(size(img)))
          # set the first image on screen of Makie window
          GLMakie.image!(scene, obs_img)
          # display the GLMakie scene
          display(scene)

          # find fps of our camera
          fps = VideoIO.framerate(cam)

          # until the window is open
          while GLMakie.isopen(scene)
            # read from camera
            img = read(cam)
            # we can process our image here
            # you should comment below 4 lines if don't wanna save
            img = process(img)
            push!(imgstack, img)
            framecounter = framecounter + 1
            if(framecounter == frames) break end

            # update image in the window
            obs_img[] = GLMakie.rotr90(img)
            # delay to achieve right framerate
            # also when you don't delay, it ends up hanging everything as
            # it's a while loop with no control and huge number of reads.
            sleep(1 / fps)
          end
        finally
          # in any case, close cam after use
          close(cam)
       end
Now, let’s see what we recorded through our example:
Link : https://i.imgur.com/mNjOtTl.mp4
Here we have it!!! It’s that easy to use VideoIO.jl for making videos and apply processing on them.
In case you want to open an already made video, process it and then show it, below example will prove to be very useful:
julia> io = VideoIO.testvideo("annie_oakley") # for testing purposes

julia> f = VideoIO.openvideo(io)

julia> img = read(f)

julia> obs_img = GLMakie.Observable(GLMakie.rotr90(img))

julia> scene = GLMakie.Scene(camera=GLMakie.campixel!, resolution=reverse(size(img)))

julia> GLMakie.image!(scene, obs_img)

julia> display(scene)

julia> fps = VideoIO.framerate(f)

julia> while !eof(f) && GLMakie.isopen(scene)
  img = read(f)
  img = process(img) # change it accordingly
  obs_img[] = GLMakie.rotr90(img)
  sleep(1 / fps)
end
Saving to a Video using VideoIO.jl 🎅
Now finally we want to save our data to a video, there are two general ways to go about that using VideoIO.jl. There can be a case where we directly want to save an img stack which has lot of images in it and we want to save it. Below is how we save the data to video using imgstack, we can configure encoder options and framerate ourselves.
julia> encoder_options = (crf=23, preset="medium")

julia> VideoIO.save("video.mp4", imgstack, framerate=30, encoder_options=encoder_options)

Latest comments (1)